
The event page and its links
What attendees see on your public event page, and the three links on the Information tab – event page, invitation link and payment page link.
Every event has a page on theground.io/events/public/…. The Information tab of the event dashboard is where you preview it and copy its links.
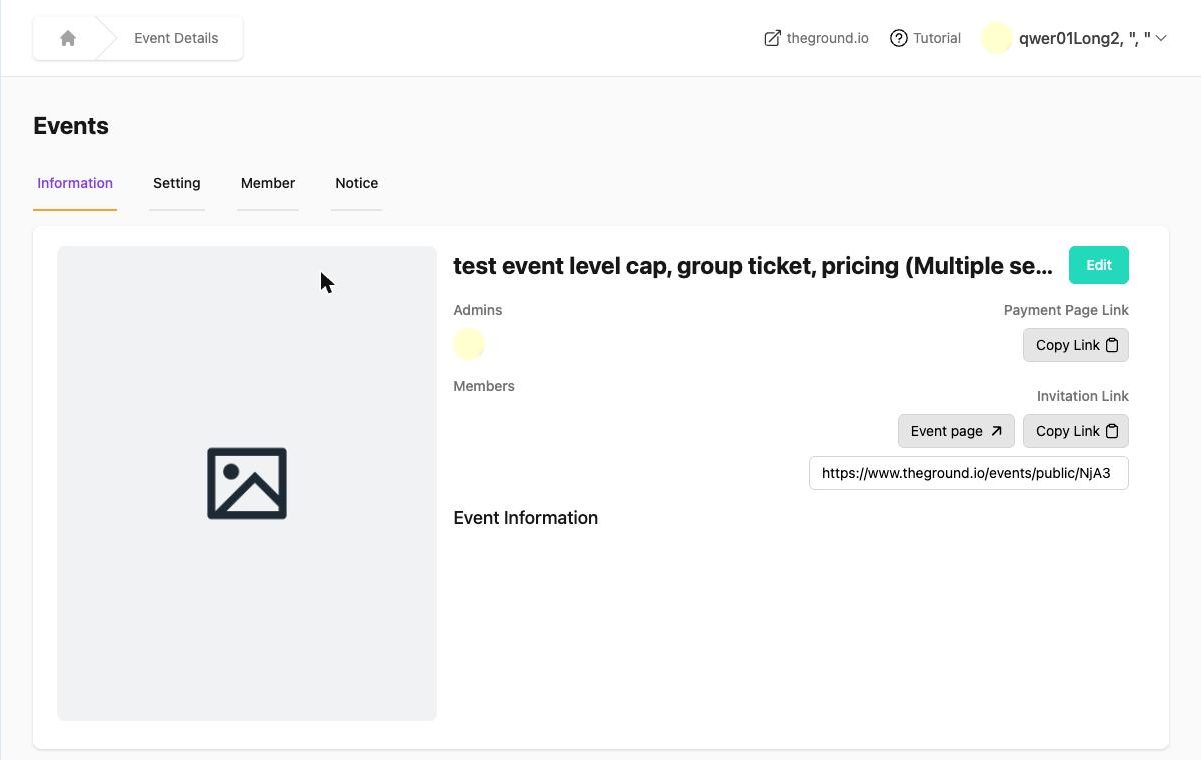
The links#
| Link | Where | Use it for |
|---|---|---|
| Event page ↗ | Information → button | Opens the public event page in a new tab so you can check it. |
| Invitation Link (Copy Link) | Information → Invitation Link | The address of the event page. Anyone with it can view the event and request to join – even if the event is Private. This is the link you paste into WhatsApp, Instagram bio, e-mails. |
| Payment Page Link (Copy Link) | Information → Payment Page Link | Takes a member straight to the payment step for this event – pay by card through Stripe, or upload proof of an offline (FPS / PayMe) transfer. Send it to people who joined but have not paid yet. |
What attendees see#
Top to bottom, the event page shows:
- Poster (your 4:5 photo), event name and your organization name and logo (links to the organization page).
- Date & time (start → end, or To be Announced) and the venue with a Show map link.
- Spots – "15 spots", "14 going" or "Unlimited spots", depending on capacity and the public RSVP list.
- Price block – Free, or the ticket price. Early bird shows the reduced price until its deadline; group discounts show "× 2 or more – HKD 320.00" style tiers; with multiple ticket types, each ticket type is listed with its own price and description.
- Join button – Sign in to Request to Join / Request to Join / Join. The wording depends on whether the visitor is logged in and whether the event requires approval. Once the sign-up deadline has passed or the event is full or cancelled, joining is closed.
- Share with friends – the visitor's own share buttons.
- Event details – your description, exactly as formatted in the admin.
- Venue with a map, Hosted by (the event admins), Who's going (the RSVP list, or "Hidden by the organizer") and Contact information (the organization phone and the event contact e-mail).
Joining from the attendee's side#
- The attendee signs in to theground.io (Google or e-mail – the same account system as the admin).
- They click Join / Request to Join, pick the number of tickets (group tickets) or their sessions / ticket type, apply a promo code if they have one, and fill in your sign-up form.
- If approval is required, their status becomes Pending until you approve them.
- Paid events: they pay by card / Apple Pay / Google Pay through Stripe, or follow your offline payment instructions and upload a screenshot.
- Once approved (and paid), they get a ticket with a QR code in My events – that is what you scan at the door.
Editing what is shown#
- Poster, name, description → Information tab → Edit.
- Date, venue, capacity, visibility, contact e-mail, RSVP list → Setting tab → Update.
- Organization name, logo and phone → Organization Settings.
Was this article helpful?Thanks for the feedback! Still stuck? Email us.